
Otherwise known as a ‘Plant’ation Privacy Screen. Like many of you, I saw the original idea for this project in Sunset Magazine, though I am sure the designer who created it was not the first to do this, she certainly did it up beautiful! The Sunset Magazine version featured a gorgeous project completed by San Francisco area floral designer, Baylor Chapman of LilaB Designs. The magazine gave a little information on how the shutters were constructed and it sounded pretty basic (weed barrier fabric was stapled to the shutter to create pockets), so I thought I’d give it a try.

'Plant'ation Privacy Screen on the auction block at the fundraising Gala for Conservation Garden Park
Except that I don’t live in the ideal climate provided by the California Coast which meant I had a lot more factors to take into consideration than the original designer would have to worry about. Not even succulents can survive our real-world heat and intense summer sunlight planted in just weed barrier fabric pockets! In addition, I did’t want to be limited to just Utah-hardy succulents (sedums and sempervivums), I wanted to enjoy the massive array of mediterranean climate succulents- which means overwintering them indoors and THAT meant making it possible for the plants to be overwintered indoors. This “easy” project is getting a lot harder already! Luckily, I like a challenge and I lack a reliable idea filter.
The first thing I needed to make the project work was a plantation shutter. Ideally, you’d use solid wood (as I did) or, even better, vinyl. The classifieds section is a good place to find a used shutter. Since I was creating my to be a one-of-a-kind piece for a chartity auction to benefit Conservation Garden Park, I decided to try and get a nice one donated.
I was a little nervous to call Stanfield Shutter (the leading company in this area for plantation shutters) and tell them about my crazy idea! Thankfully, not only did they hear me out without hanging up, they gave me a huge 6 foot tall by 4 foot wide shutter with extra wide slats to play with! Thanks to Stanfield Shutter!

Thanks to Stanfield Shutter for donating this gorgeous plantation shutter!
The next step was to retrofit it for our purposes. This meant adding vinyl trim pieces to the top and bottom of the shutter for better weather protection and gluing vinyl wedges between the slats to hold them in the desired open angle. I just purchased vinyl trim pieces from Home Depot for trimming out the shutter. My poor Dad (pictured below) is often roped into things like this, bless his heart. He’s trained so well now that he just helps me get it done without thinking I’ve totally lost it. My spouse is still on a learning curve with that but he’ll figure it out eventually!

Retrofitting the shutter for long-term viability.
Once the plantation shutter is prepared, it’s time to make the custom pockets. Now, I used a piece of paper to trace the shape along the ends I needed for the boxes which would account for the slope. That caused one side of my square shape to be longer than the other. Honestly, you could proably get away with just doing the sides the same length- once the plants grow the difference will be minimal.
To create the pieces of the box, I used a layer of weed barrier fabric on the outside (allows air and water to pass but not too quickly), 2 layers of felt in the middle (to help insulate, hold water longer, and help retain the shape) and then a layer of burlap on the innermost surface (to give the roots something to grip). At first, I tried to make the seams be on the inside of the pocket but that doesn’t work so well. You won’t see the pockets so go ahead and do it the easy way by sewing the seams so that they are on the outside of the box. Just trust me on that!

Pocket pieces before stitching together.
I thought I might need to velcro the pockets in place so I went ahead and added velcro to the pockets before sewing them together. Turns out it was uneccesary. If the pockets are reasonably accurate in size, they’ll stay in place just fine.

Pockets all assembled and waiting for the final piece. Note how the seams are on the outside of the pockets- this keeps them more rigid.
For the top, I used a special ‘fabric’ type thing I get locally at Tai Pan Trading. It is a synthetic mesh which has real moss adhered to it. It’s messy. Bits of it are still in my sewing machine but it’s worth it. The mesh works really well for vertical gardening projects because it enables the plants to grow through it while the brown mesh and green moss serve as camoflague for the other elements in a vertical application. I wish I could find an online source for it but since I don’t even know what it’s called, that would be hard. I am sure you can use other types of mesh product so long as they have larger holes (no fine mesh). Even so, you’ll still have to cut a few bigger holes in the mesh to insert the plants.

Empty pockets with moss mesh tops.
I filled the finished pockets with a special soil formula which involved perlite, succulent soil mix and coconut fiber. As always, I rinsed the soil off the original plants. Every grower uses a different soil blend and most of them are awful for succulents. If you want to know more about the culture of succulents, check out the Cacti and Succulent Forum on the Garden Web. Those folks know EVERYTHING!
Many of the plants for this project were donated by Millcreek Gardens. LaRene (the owner) is extremely generous and she likes a weird good garden project too! Some plants were pulled from my own pots on my front porch and a few were purchased.

Pockets filled with soil and ready for plants to be added. Cut the mesh as needed to get the root balls inserted. You MAY have to sew or zip tie the mesh closed if the hole is large.
As for watering frequency, the succulents would need to be watered about once per week if the shutter is outside and in PART SHADE- the non-hardy succulents can’t take our REAL sun at this altitude! This screen has spent most of it’s time indoors since it was planted. I watered the plants throuroughly right after planting 2 weeks ago and just now watered them again. Please note, the plants NEED to dry out after watering. They prefer a good soak so the soil is fully wet and then a good period of dry soil before wetting it again. A consistently moist soil or lightly misting them with a spray bottle will produce less desireable results. Consistently moist soil is the kiss of death for succulents while misting will create shallow roots and weak plants.
In the proper setting and with a water resistant shutter, you wouldn’t have to remove the pockets at all for watering outdoors, just soak them through with the hose. In the winter months, indoors, the plants may only need water once a month or potentially less but you’d need to pull the pockets out to water them.

close up view of 'Campfire' Crassula nestled into the faux moss-covered pocket
The end result of all this work is a planted privacy screen that can be installed on a deck for the warm season and stored away in the cold months (unless you’ve got a sunny south window and a tile floor indoors!) The plant pockets can be removed for watering if you don’t have a vinyl shutter and you want to ensure better long-term survival of the shutter. The pockets are narrow enough to overwinter in a sunny windowsill.

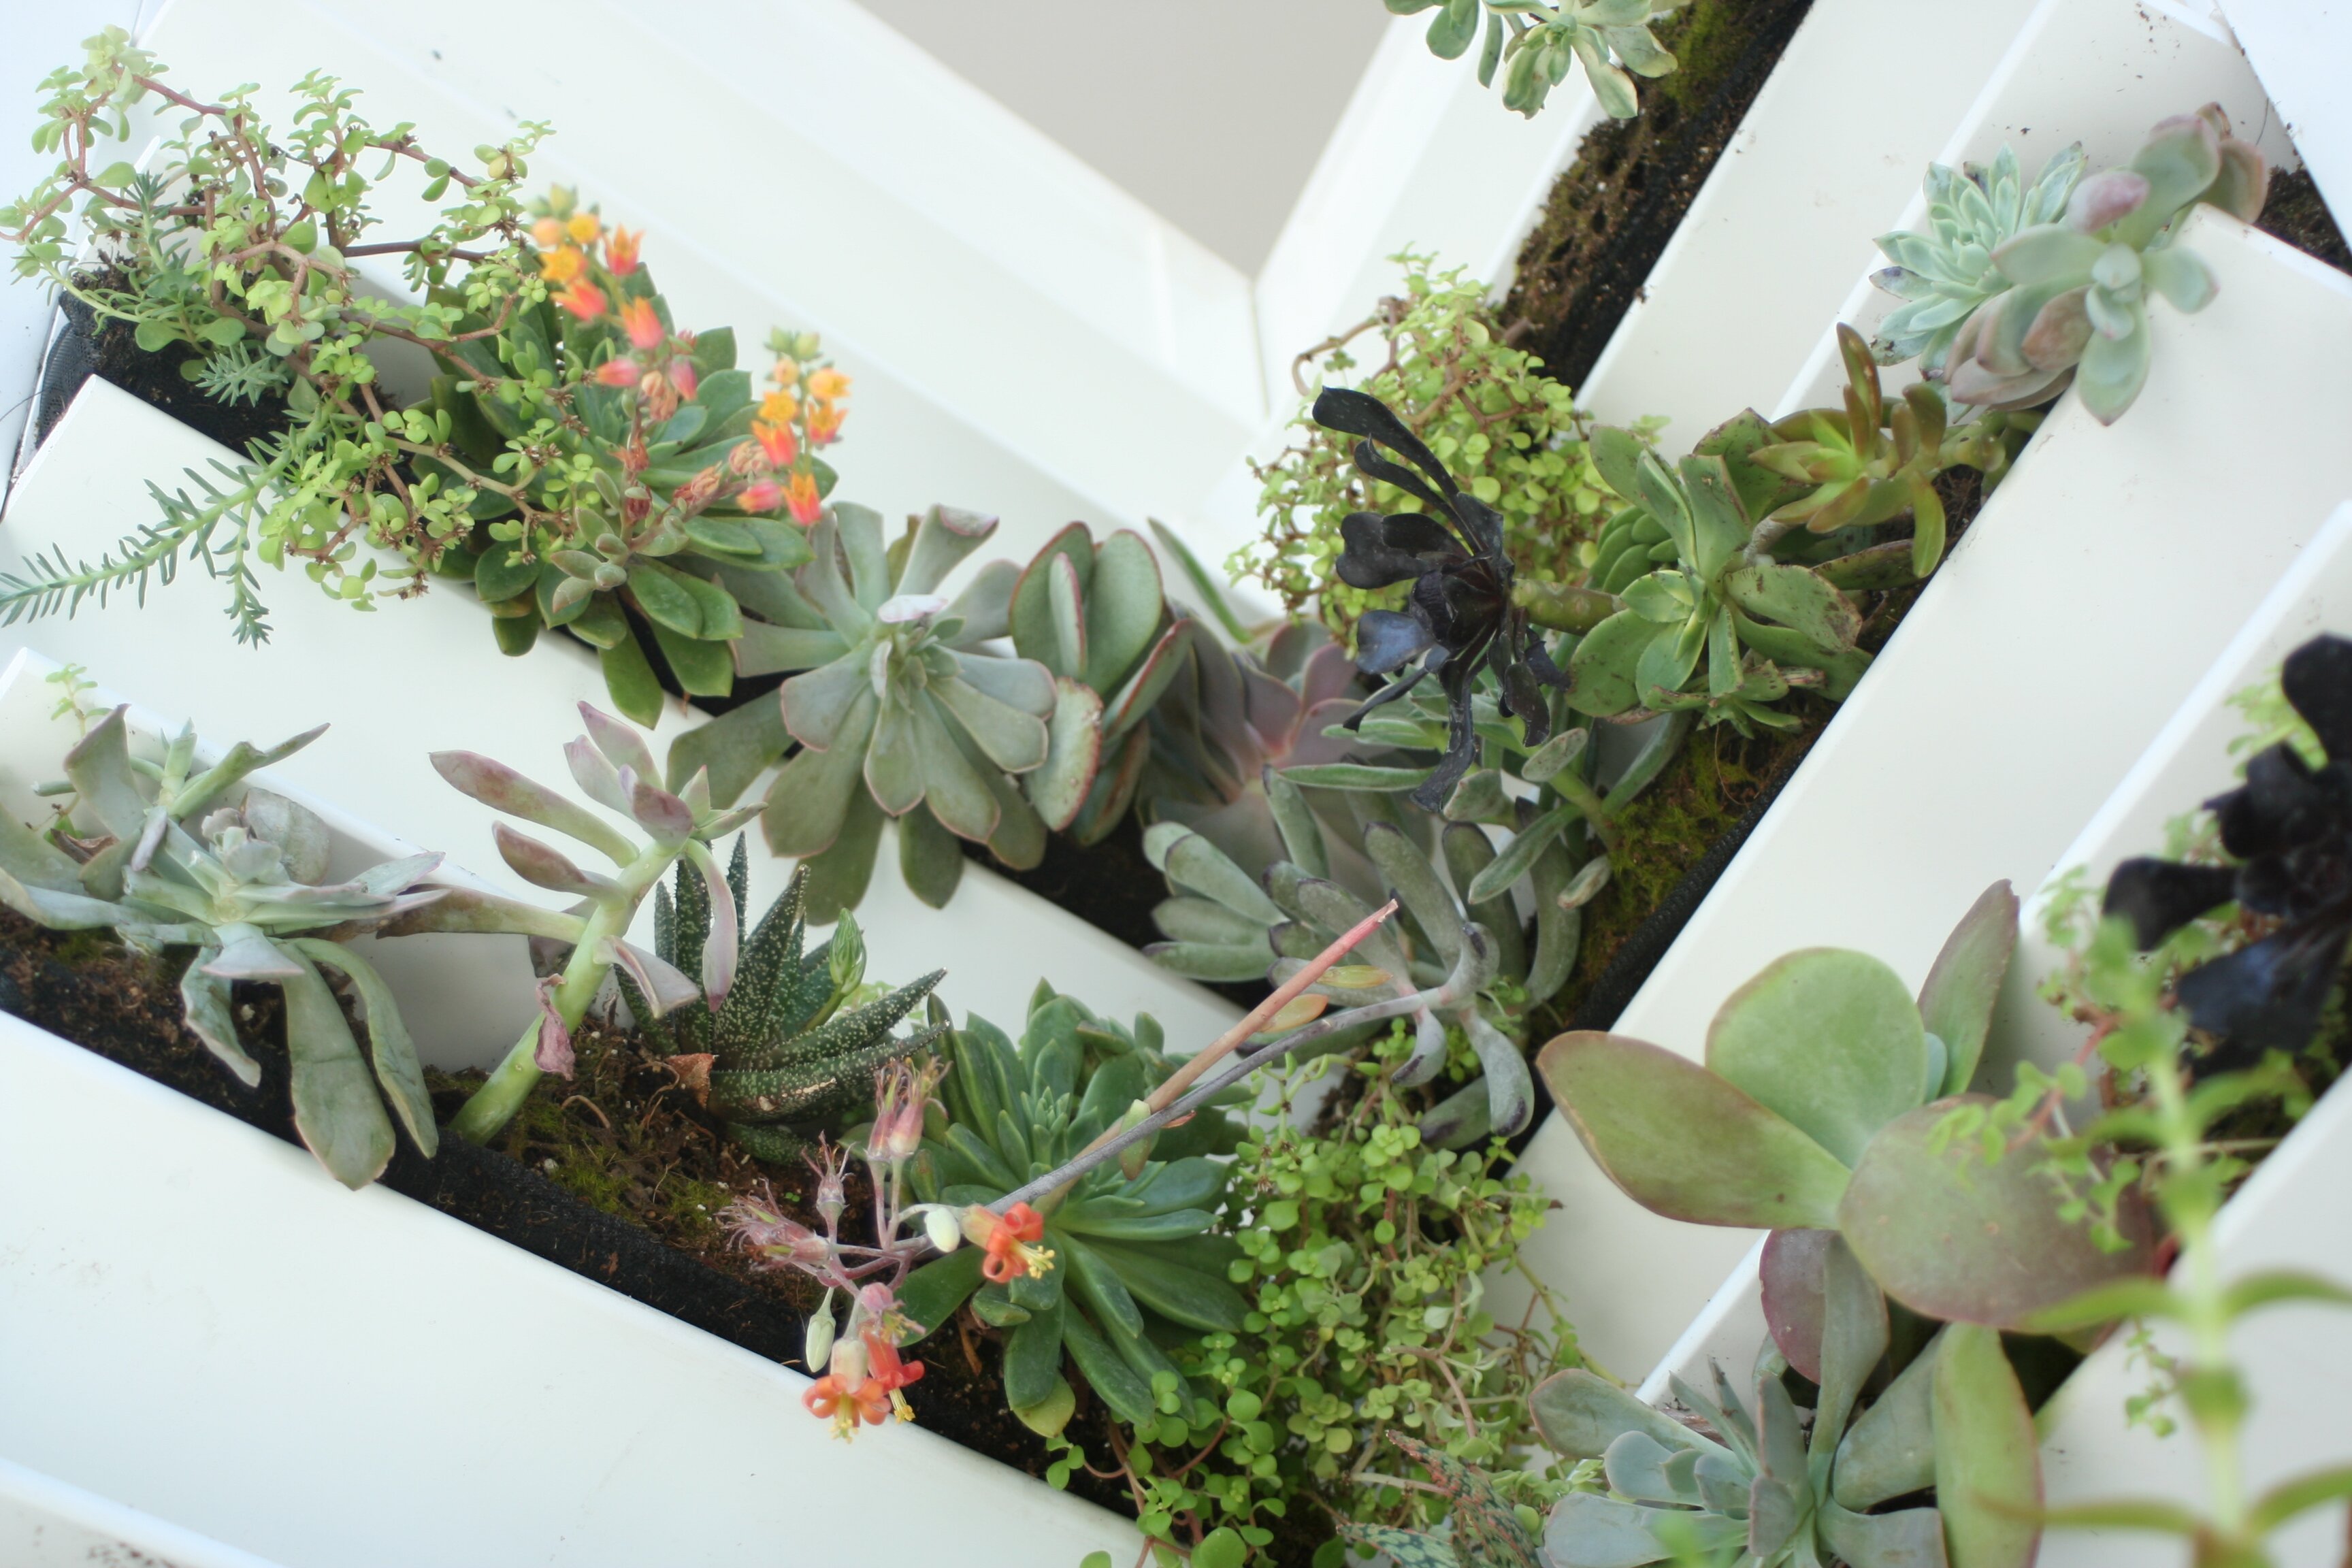
Plants will eventually be large enough to hide the gaps.
In the case of my planted pockets, the winners of this item are out of the country for awhile so I’ll likely be overwintering it for them in a nice warm greenhouse with all of my own plants. I wonder if my work will notice that I snuck them into our new greenhouse!?
Ideally, you would let the plants grow in the pockets for a 6-8 weeks to establish themselves before popping them into the shutter openings but you can get away with putting them in immediately so long as you don’t move the screen around much.

Pockets fitted into the screen
I COULD have kept my version to strictly hardy succulents- which means Semperviviums (Hens and Chicks) and Sedums. However, I wanted to enjoy the full range of succulent possibilities which meant planning for indoor/outdoor considerations.
I’d like to make a screen FOR MYSELF now that I’ve got the whole process figured out and engineered but I’m rather worn out from making this one! I will confess that part of me hopes the new owners decide they don’t really want it (and the required maintenance) and I get to keep it! Cross your fingers!
The project CAN be done reasonably cheap if you can find an inexpensive used shutter and use small plants. A little patience always pays off with succulents as they’ll propagate themselves given the right conditions. The pockets are a bit time consuming if you sew them so they are removeable as I did.
If you just want to keep it outside permanently, you can probably get away with stapling the materials to the slats as the original designer did but I would recommend you use similar materials to those I recommended above or your plants will dry out much too quick.

On display for the Garden Gala
I would rate this project a 3 of 5 stars for difficulty if you’re making removeable pockets as I did. If you just staple the fabrics in place, it’s a 1 of 5 stars for difficulty but may be more a pain over the long term for maintenance. While the project is not that hard, it can take a lot of time to create AND care for. Make sure you’re willing to do both of those things before starting. If anyone else is crazy enough to attempt it, feel free to ask questions in the comment section or e-mail me. I’d love to see photos when you’re done!

 Subscribe in a reader