I know what you’re thinking– why in the world would I want tacky plastic edging? Well, because it’s only tacky if it is improperly installed, and it is almost ALWAYS improperly installed! Done right, inexpensive edging will keep grass in it’s place while also serving as a swale ( a rounded depression) to collect excess water and a catch-all to prevent run away mulch from ending up on the lawn.
Sean Jones and the crew of Solscapes (a Salt Lake City based Landscape Construction firm) are going to show us how to install inexpensive edging in a way that looks great (or more importantly– looks invisible!). First, we start with a good-quality edging. For homeowners, Sean recommends the contractor-gradevariety available at Home Depot or Lowes or other big box store. While you are there, pick up a large box of landscape staples– you can find these near the weed barrier mat products. Do not buy any of the landscape stakes made to go with the edging — you won’t need them.
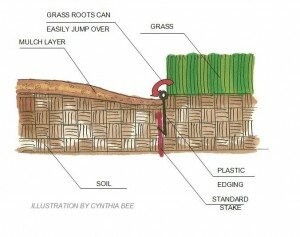
Wrong way: The problem with the ‘recommended’ installation is three-fold:
- Edging with soil packed in on both sides can easily “frost heave” which means it is pushed up out of the ground with the freezing and thawing cycle of soils.
- More importantly, the standard install gives you LITTLE barrier against invading grass.
- Loose mulch is likely to slip right on past the edge and into your lawn.
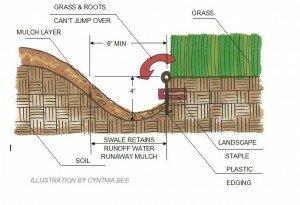
Done the RIGHT way, inexpensive plastic edging will:
- It will collect any mulch or bark which sloughs off your planting area and ‘hold’ it until you can rake it back where it belongs rather than cluttering up the lawn.
- The most IMPORTANT function is that the swale makes it very difficult for any grass root runners to hop the edging and get into your garden bed. Roots which find their way around your plastic edge will only find air on the other side– not soil– and thus there is nowhere to dig those roots in and RUN. This is why it must be deep and wide– to ensure that it outwits encroachment by our very determined lawns.
- It provides an area for excess water to collect and percolate into the ground.
- It creates the visual illusion of bermed (mounded) planting beds.
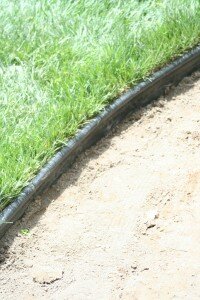
- It creates a crisp transition line from lawn to bed that is all but invisible from the lawn side (the most common viewpoint).
Now, let’s install it!
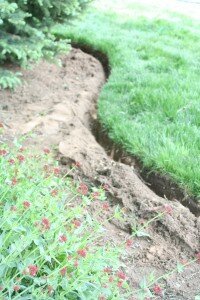
To begin, lay out the rolls of edging on the lawn to warm in the sun which will help them become more pliable. While that’s going on, dig down the edge of your border. And I mean dig down– a good 4–6 inches! This is the first place people mess up the installation. You should have a crisp, straight edge. Now go back over it and make sure there are no lumpy spots on the lawn side of the edge you’ve created.
You want to create a swale that is at least 4–6 inches WIDE before you slope back up to your landscape bed. This creates the illusion of bermed beds (or makes the berm appear taller than it is– thus saving on the amount of soil needed to create them). The open swale is there for three reasons:
Note– you cannot make a swale as shown above with concrete edging. It will undercut and destabilize the concrete, eventually causing it to fall into the swale and break. Just one of MANY reasons I personally do not like concrete edging (gasp!). The technique described here CAN be used with aluminum or steel edging if you have the budget to buy the expensive stuff!
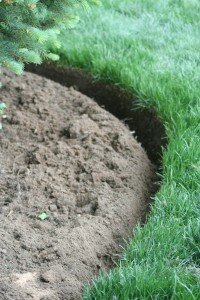
The edging should be placed so it is about 1/2 inch above the soil line on the grass side. Most of the edging will be visible from the bed side– even after the soil is packed in place and the bed is mulched. Use 2 staples to secure the end against the edge. Hammer them in with a rubber mallet or heavy duty hammer. The staples should go in horizontal or with a very slight downward angle. If you created your swale properly, it’s easy to hammer these in because you’ll have good access. You will note that there is still and inch or so of soil below the edging– that’s fine. Apply more landscape staples as needed along the edge about every 12 inches or so– use your judgment.
Once the edging is in, use discarded soil dug from the trench to fill any gaps between the edging and the lawn and pack it down well. Make sure you walk the bottom of the swale and pack that down well too.
Now sculpt the bed edge to make the swale nice and gentle from that side, making sure to leave the bottom in tact. Apply mulch or rock to the beds and you’re done! Installed this way, the edging will be invisible from the lawn side, creating a crisp visual transition, and it will STAY installed for many years to come!
If you’re still reading this– great! This topic may be a little dry but it is one of the main questions I am asked by DIY Homeowners. And now you know how to install it too!


Awesome! Now where was this article when I installed mine WRONG last summer? I finally ripped it up. Thanks for the guidelines and I love how you have the photos to demonstrate. Great job!
WOW just what I was searching for. Came here by searching for diy landscape edge