After I created the original “Plant”ation Shutter Planter I SWORE I would never undertake a project like that again (might have sworn WHILE undertaking it too)! Sewing custom pockets from felt, burlap, faux moss netting and weed barrier fabric was a nightmare! By the time I finished it, I REALLY wished I hadn’t donated it to the Conservation Garden Park Gala for the auction– after all that work, I wanted to keep it!

The original. HUGE shutter donated by Stanfield Shutter Company, tender succulents donated by Millcreek Gardens.
However, I recently discovered an amazing product called TUF-FELT which is supposed to be some sort of flooring underlayment but, thanks to some wonderful innovators, has found an ‘off label’ use as fabric to create vertical green walls. I decided I might just make MY OWN ‘Plant’ation Shutter Planter afterall! Armed with some Tuf-Felt, I was prepared to try the Plantation Shutter Project again– but in a form which could be easily replicated! Whew! While the original version took me several DAYS to create, this gal was assembled and planted in just 2 hours! Best of all– you really don’t need to have special skills or talents to pull off this version for yourself! The tutorial below is long but I wanted you to have ALL the details. You can probably figure it out just by looking at the photos!
MATERIALS
Plantation Shutter- you will need one that is either made out of wood OR made out of vinyl. That can be tricky because most of them are made out of a composite material that is totally unsuitable as it will soak up the water and fall apart quickly. It will also need to be the type that has the larger louvers. The shutter can be large or small– it’s up to you! My shutter is 64 inches tall and 22 inches wide. I bought mine at the Habitat for Humanity ReStore but the KSL Classifieds or Craig’s List are also good choices. Cost: $10

THIS shutter is too big! THIS shutter is too wide! Ah, this Shutter is just right!
Plastic Strip– This needs to be the length of the top of your shutter. You will adhere it to the top to keep water from infiltrating the open grain part of the wood (even vinyl shutters have sides that are wood with vinyl over the top so the same potential water issue exists. I just bought a weird plastic strip at the big box store called panel connector’ that was $2 in the wood moulding dept. Cost: $2

Looks something like this– it is rounded on the top so it sheds water.
Outdoor Weather-Proof Caulking & Caulking Gun- Buy this in the window and door aisle, you will use this to seal any parts that could absorb water when you don’t want them to! Total Cost: $5 for the caulking, I already had the caulking gun but they are just a couple of bucks if you need one.

Outdoor waterproof silicone caulk & close up of Tuf-Felt
Tuf-Felt- A fellow landscape designer (Rosey Cobbley) and I went in on some Tuf-Felt and ordered a bunch for our respective projects. I do not believe there is a local source for this– we had to buy it via the company online but they were wonderful to accommodate us! We ordered the 1/2″ thick type and I used 2 yards, cut into the proper width strips, for this project. It’s fairly inexpensive (around $12 per yard) so you may as well get a little extra! Cost: $24
Staple Gun- You just want a hand-held staple gun. A pnuematic gun will apply too much pressure to the louvers. I used 1/2 inch sized staples in mine. I already had these– free.
Brackets– You can purchase pre-made fancy ones at the Big Box store like I did OR you can make some quite simply. If you plan to wall-mount the finished shutter, you will not need the brackets. You will use 1 x 4 pine boards instead– read ‘alternate installation’ instructions below for more details on that! I will admit that the fancy brackets I wanted were pricey– Cost: $14 per pair, total cost $28. You can save a lot here by simply bracing a plain board on a 45 degree angle if you wish.

Brackets & spray paint products I used.
Stabilizers– this is just 2 strips of wood that will be used to stabilize the brackets and help hold up your shutter (only for freestanding install). They should be about 18″ long, depending on the size of your shutter, and preferably made out of a hardwood or even cedar or redwood since they are the part that will come into constant contact with the ground.
Primer, Spray Paint & Sealant- Use this to paint your brackets and stabilizers white. I had this on hand but if you need to purchase it, make sure it is rated for outdoor use and expect a cost of $4 per can. You will not use full cans of any of it.
Soil- I would use a mix of potting soil and coconut coir. Coconut coir is my secret ingredient in container gardens of all types and it holds 10x it’s weight in water and keeps more even moisture in containers. Generally, I would NOT do this with succulents as they want to dry out but in the unusual planting application we’ve got going on, the coconut fiber will provide an extra measure of insurance. AVOID soils with peat moss if you can– peat moss is a pain and doesn’t work as well as coconut fiber. Most of the quality nurseries will carry coconut fiber. It is a staple for me and I always have it on-hand. No cost for this project but expect it to be about $12 for a big bag at Steve Reagan Company (where I purchased it) or you can get simple bricks that you can hydrate from Miller Landscape Products.
Plants!- I am using Utah-hardy succulents. I will list the varieties below. You need NOT put in as many plants as I did– they will fill in! I used a ton because I knew that this little lady was going to be on tv and she wanted to look like a rock star while doing it! Since I do tons of succulent projects, I have these all over the place. Harvest them from your landscape for free OR you can buy them. To purchase as many plants as I put in this project would cost around $100 but can be somewhere between cheap and free. Smaller plugs are better as you’re fitting them into the small spaces between the louvers.
Optional- Dry Sphagnum moss to tuck in between the plants and hide the soil/ keep it from washing out. I have this on-hand to so no cost for this project.
Total Project Cost Estimate: Between $40-$200 depending on how much you have already or can get for free, the size of the shutter and number of plants desired, and access to basic tools and materials.
The impact, is priceless. I had a neighbor stop her car and come from 2 houses away to see what in the world I had on my front porch. HUGE impact. Then again, being as I’m prone to crazy projects, it might have been to assess my mental health!
Assembly:
I will try and keep this part brief as it is pretty simple– rounding up the products you need is the trickiest part!

My sweet Dad double checks my engineering (thank goodness– I didn’t pass!) and attaches the brackets and strengtheners to the shutter.

Add waterproof strip to the top of the shutter and then caulk around it to seal. Caulk all exposed parts where water could seep in.

Cut Tuf-Felt into strips as wide as your louvers. Use scissors you don’t care about or, even better, a box cutter.


Side view of finished ‘pockets. No sewing . Just carefully fill with soil and the soil will keep them in place.

Lean the shutter back to fill the pockets with soil so you are working WITH gravity rather than against it!

Use a mix of Sedums and Sempervivums (Hens and Chicks) to fill the pockets. Smaller size plants are better.

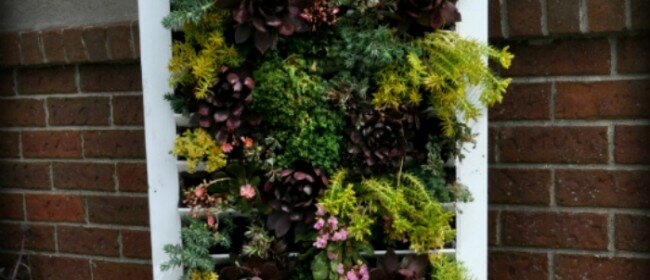
Side view of planted pockets!

It’s Done!
Alternate Assembly
If you wish to wall mount this on a block wall or wood outdoor shed, skip the steps that require the application of feet and instead use 2 x 4s to create a frame the same size as the shutter. Make sure there are drainage holes on the bottom part of the frame. Attach the plantation shutter to the shadow box AFTER you create the pockets (don’t make them deeper than the boards) then attach the entire unit securely to the wall or shed. THEN fill it with soil and plants! Remember that a fully loaded shutter with soil, plants AND the weight of water can be pretty heavy. Engineer your project accordingly. If you under-engineer it– it will fail. Never hurts to double check, as I did, with an experienced handyperson to ensure your calculations are accurate.

Do you want to see this plantation shutter planter live and in person? We’ll have it on display at the kick-off party for the new Jordan Valley Home & Garden Club. The garden party kick-off (called the “Summer Soiree”) is $10 and open to anyone over the age of 18 (meaning men are welcome but expect it to be girly, sorry no children)! At the event, we will learn from home & garden experts, stroll the gardens, and meet new friends who share your interests. Special mini-classes and demonstrations by nationally recognized DIY experts will be offered as well as live music and delicious appetizers– all in a gorgeous garden setting at Conservation Garden Park. You can register for the Soiree HERE.
Regular Club meetings will begin in July and are free of charge. Join us!
Here’s the link to the Studio 5 video! Try not to notice that I’m an old fattie and just enjoy the plants~!
 Subscribe in a reader
Very beautiful plantation shutters and it’s incredible to seem them home made.